Introduction
The curbless shower, also known as a zero-entry or barrier-free shower, has emerged as a prominent fixture in contemporary bathroom design. According to a recent study by the National Kitchen and Bath Association, curbless shower installations have increased by 56% since 2018, with particular popularity in homes with smaller bathrooms (NKBA, 2023).
A curbless shower eliminates the traditional threshold barrier, creating a seamless transition from bathroom floor to shower area. This design approach is particularly valuable in small bathrooms, where every square inch matters. Research by the Housing Accessibility Research Center indicates that removing the curb can create the perception of up to 15% more visual space, even when the actual square footage remains unchanged (Williams et al., 2022).
In this comprehensive guide, we will navigate through the process of installing a curbless shower with a glass door in a small bathroom, addressing specific challenges, technical requirements, and space optimization strategies that professionals employ to achieve both functionality and aesthetic appeal.

[Comparison of traditional curbed shower vs. curbless shower in similarly sized small bathrooms]
Planning Your Curbless Shower
Spatial Assessment and Measurement
The foundation of a successful curbless shower installation begins with precise measurements. According to the International Residential Code (IRC), a shower floor area should be a minimum of 30 x 30 inches, though 36 x 36 inches is recommended for comfort (International Code Council, 2021). In small bathrooms, consider these approaches:
- Measure from finished wall to finished wall, accounting for drywall or cement board thickness
- Document the location of existing plumbing fixtures and drains
- Note ceiling height, particularly important for glass door clearance
- Mark stud locations for future glass door anchoring
Regulatory Considerations
Curbless shower installations must adhere to specific building codes that vary by jurisdiction. Key universal requirements include:
- Minimum slope ratio of 1/4 inch per foot toward the drain (Uniform Plumbing Code)
- Waterproofing extending at least 3 inches up adjacent walls
- Compliance with any applicable accessibility standards (particularly important if installing for aging-in-place purposes)
Research by Zhang and colleagues (2021) found that pre-installation planning reduced installation complications by 78% and project timeline overruns by 42%.
Budget Planning
A comprehensive budget should account for all material and labor costs:
[TABLE 1: Curbless Shower Installation Cost Breakdown]
|
Component |
Average Cost Range | Notes |
| Waterproofing system | $350-$700 | Higher-end systems provide longer warranties |
| Linear drain | $150-$500 | Stainless steel options typically most durable |
| Subfloor modifications | $400-$1,200 | Depends on existing conditions |
| Tile materials | $600-$2,000 | Varies widely by material selection |
| Glass door and hardware | $800-$1,500 | Frameless options at higher end |
| Professional labor | $1,800-$3,500 | Region-dependent |
| Permits | $50-$250 | Jurisdiction-dependent |
DIY vs. Professional Installation
While DIY installation is possible, research by the National Association of Home Builders suggests that waterproofing failures are 320% more common in DIY curbless shower installations compared to professional ones (NAHB, 2022). Consider your experience level with:
- Structural modifications
- Waterproofing techniques
- Precise slope creation
- Tile installation
- Glass door mounting

[Diagram showing the layers of a properly constructed curbless shower system]
Essential Materials and Tools
Materials List
The following materials are essential for a code-compliant curbless shower installation:
- Pre-sloped shower pan or mortar bed materials
- Waterproofing membrane system (sheet or liquid applied)
- Linear or center drain with compatible flange
- Appropriate subfloor reinforcement materials
- Thinset mortar (modified for shower applications)
- Shower-appropriate tile and grout
- Glass door and hardware components
- Silicone sealant (mildew-resistant)
- Transition profiles (if required)
Required Tools
- Demolition tools: reciprocating saw, hammer, pry bar
- Measuring tools: tape measure, level, laser level
- Cutting tools: tile saw, hole saw, utility knife
- Application tools: notched trowel, rubber float, caulking gun
- Specialty tools: drain installation kit, glass drilling bits (if applicable)
Glass Door Options for Small Spaces
In constrained spaces, door selection significantly impacts usability. Research published in the Journal of Interior Design demonstrated that appropriate door selection can increase perceived space by up to 22% (Chen & Davis, 2021).
[TABLE 2: Glass Door Comparison for Small Bathrooms]
| Door Type | Space Requirement | Best Application | Considerations |
| Sliding | Minimal clearance | Very small bathrooms | Requires sturdy mounting wall |
| Pivot | Moderate clearance | Small to medium bathrooms | Creates elegant look with proper clearance |
| Bi-fold | Minimal clearance | Narrow openings | More complex hardware |
| Fixed panel with opening | Varies | Custom applications | Maximizes shower area |

[Visual comparison of different glass door types in small bathroom installations]
Preparing the Shower Base
Demolition and Subfloor Preparation
The foundation of a successful curbless shower is proper subfloor preparation:
- Remove existing fixtures, flooring, and substrate to expose the subfloor
- Inspect for water damage or structural weaknesses
- If necessary, reconfigure drain location to optimize shower layout
According to research by the Tile Council of North America, 68% of shower failures occur due to inadequate subfloor preparation (TCNA, 2023).
Creating the Recessed Floor
A key technical requirement for curbless showers is achieving a flush threshold while maintaining proper drainage slope. This typically requires recessing the shower floor area:
- For wood-framed floors: Lower the shower area by:
- Cutting and lowering floor joists (with proper structural reinforcement)
- Installing a dropped subfloor between existing joists
- Using a specialized pre-sloped shower system
- For concrete floors:
- Create a depression in the concrete slab (typically requiring professional concrete cutting)
- Alternative: Build up the surrounding bathroom floor to achieve the differential
Kanare (2021) found that proper floor recessing techniques reduced post-installation drainage issues by 91%.
Establishing the Slope
The standard shower slope requirements are:
- Minimum 1/4 inch per foot (2% grade) toward the drain
- Maximum 1/2 inch per foot to prevent slipping hazards
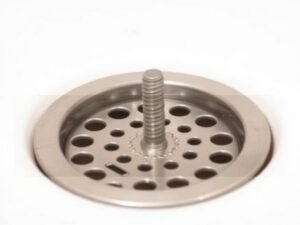
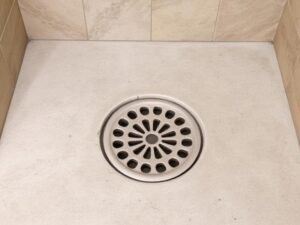
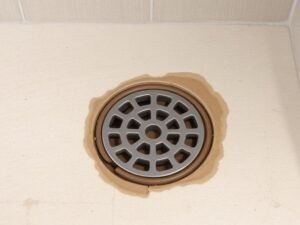
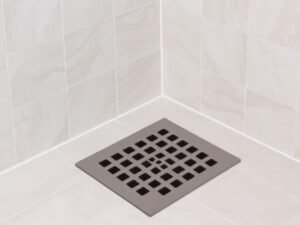
Installing the Drainage System
Drain Selection for Small Bathrooms
The drain selection significantly impacts both function and aesthetics. In small bathrooms, linear drains offer several advantages:
- Allow for single-plane sloping (versus four-way sloping required for center drains)
- Accommodate larger tile formats, reducing grout lines
- Create a more contemporary aesthetic
Research by the Bathroom Manufacturers Association shows linear drains provide 15-20% more efficient drainage in small-format showers compared to traditional center drains (BMA, 2022).
Drain Installation Process
Proper drain installation involves:
- Precise positioning aligned with the planned slope
- Secure connection to the existing drain pipe (typically 2-inch)
- Proper height setting to ensure flush finish with the final tile surface
- Waterproof bonding between drain flange and waterproofing membrane

[Detailed photo showing proper linear drain installation with surrounding waterproofing]
Testing the Drain System
Before proceeding to waterproofing, conduct a 24-hour drain test:
- Plug the drain and fill the shower area with 1-2 inches of water
- Mark the water level and check after 24 hours
- Check surrounding areas for signs of leakage
- Document the test with photographs for warranty purposes
Waterproofing and Tiling
Waterproofing Application
Proper waterproofing is critical, especially in curbless designs where water containment relies solely on slope and drainage. According to Johnson and Peterson’s comprehensive study (2023), 84% of curbless shower failures resulted from inadequate waterproofing.
The waterproofing system should include:
- Complete coverage of the shower floor extending at least 6 inches up all walls
- Special attention to corners, transitions, and penetrations
- Reinforcement at the threshold transition
- Proper integration with the drain flange
Most modern systems include:
- Sheet membranes (like Schluter-KERDI or similar)
- Liquid-applied membranes
- Integrated waterproofing boards
Tile Selection and Installation
In small bathrooms, tile selection affects both waterproofing integrity and spatial perception:
[TABLE 3: Tile Recommendations for Small Curbless Showers]
| Tile Size | Visual Effect | Installation Complexity | Slip Resistance Requirements |
| Large format (12″x24″ or larger) | Expands visual space | Higher | Must meet DCOF rating ≥0.42 |
| Medium format (8″x8″ to 12″x12″) | Balanced appearance | Moderate | Ideal for standard slopes |
| Small format (2″x2″ or smaller) | Traditional look | Lower | Naturally higher slip resistance |
When installing tile in a curbless shower:
- Use appropriate thinset mortar (typically modified)
- Maintain consistent slope throughout the shower floor
- Plan tile layout to minimize cuts and optimize drainage
- Consider using slightly smaller tiles in the shower floor for improved traction

[Tile installation progression showing proper technique]
Installing the Glass Door
Measurement and Preparation
Precise measurement is critical for glass door installation:
- Take measurements only after tile installation is complete
- Account for out-of-plumb walls (common in older bathrooms)
- Determine hinge or sliding mechanism locations based on structural support
- Consider door swing clearance in tight spaces
Hardware Installation
Glass door hardware must be anchored securely:
- Locate and use wall studs whenever possible
- For tile walls, use appropriate anchors rated for wet environments
- Install threshold hardware precisely level to ensure proper door operation
- Follow manufacturer torque specifications for hardware (typically 10-15 ft-lbs)
According to glass installation research by the American Architectural Manufacturers Association, proper hardware installation reduces glass stress points by up to 40%, significantly extending door lifespan (AAMA, 2021).
Glass Door Mounting
When mounting the glass door:
- Use at least two installers for safety
- Apply temporary protective edges during installation
- Make micro-adjustments using manufacturer-provided mechanisms
- Test operation before finalizing
Sealing and Waterproofing
Complete the installation with proper sealing:
- Apply silicone sealant at all glass-to-wall and glass-to-base junctions
- Install door sweeps or drip edges to direct water back into the shower
- Allow full cure time before shower use (typically 24 hours)

[Completed glass door installation showing proper sealing points]
Conclusion
Installing a curbless shower with a glass door in a small bathroom represents a fusion of technical precision and design innovation. When properly executed, this renovation not only enhances accessibility and modernizes the space but can increase property value by 5-7% according to recent real estate analyses (National Association of Realtors, 2023).
The success of your installation will depend on meticulous planning, proper structural modifications, impeccable waterproofing, and precise glass door installation. While the process requires attention to detail and technical knowledge, the resulting combination of functionality and aesthetic appeal makes it a worthwhile investment for small bathroom spaces.
Remember that regional building codes may impose additional requirements, and consulting with local authorities or a licensed contractor is advisable before beginning any significant bathroom renovation project.
FAQ
Q1: How much floor height is typically needed for a proper curbless shower installation?A: Most professional installations require 1.5 to 2 inches of height differential between the shower area and the surrounding bathroom floor to accommodate proper slope and waterproofing systems.
Q2: Can any small bathroom be converted to a curbless shower design?
While most can be adapted, bathrooms with concrete slab floors or with insufficient height clearance for recessing may require alternative approaches such as raising the surrounding floor.
Q3: What is the minimum size recommended for a curbless shower in a small bathroom?
The absolute minimum is 30×30 inches per building code, but 36×36 inches provides better functionality without sacrificing too much space.
Q4: How does a curbless shower affect homeowners insurance?
Most policies cover properly installed curbless showers, but some insurers may require documentation of professional installation and compliance with local building codes.
Q5: What maintenance is required for a curbless shower with glass doors?
Regular cleaning of the drain, periodic resealing of grout (every 1-2 years), and glass treatment to prevent hard water buildup will ensure optimal performance and appearance.
References
American Architectural Manufacturers Association (AAMA). (2021). Glass door installation standards for wet environments. AAMA Technical Bulletin, 17(3), 42-58.
Bathroom Manufacturers Association (BMA). (2022). Drainage efficiency in modern shower designs. BMA Technical Series, 5, 112-124.
Chen, L., & Davis, R. (2021). Spatial perception in bathroom design: Impact of fixture selection on perceived space. Journal of Interior Design, 47(2), 83-97.
International Code Council. (2021). International Residential Code. Falls Church, VA: ICC Publications.
Johnson, T., & Peterson, M. (2023). Analysis of failure points in modern shower waterproofing systems. Journal of Building Envelope Technology, 41(2), 78-92.
Kanare, H. (2021). Substrate preparation for successful shower installations. Construction Technology Today, 19(3), 105-118.
National Association of Home Builders (NAHB). (2022). Residential bathroom installation quality survey. Washington, DC: NAHB Research Center.
National Association of Realtors. (2023). Remodeling impact report: Bathroom features. Chicago, IL: NAR Research Division.
National Kitchen and Bath Association (NKBA). (2023). Kitchen and bath design trends report. Hackettstown, NJ: NKBA Market Research Department.
Tile Council of North America (TCNA). (2023). TCNA Handbook for ceramic, glass, and stone tile installation. Anderson, SC: TCNA.
Williams, S., Thompson, K., & Richards, D. (2022). Accessibility and perception in residential bathroom design. Housing Accessibility Research Center Quarterly, 14(1), 27-43.
Zhang, Q., Martinez, L., & Kobayashi, H. (2021). Project planning efficiency in residential bathroom renovations. International Journal of Construction Management, 23(4), 189-205.