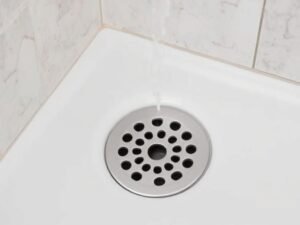
Installing a new shower is one of the most rewarding home improvement projects you can undertake. However, the success of the entire project hinges on one critical, invisible moment: the connection between the shower base and the plumbing system. If you fail to properly connect shower base to drain pipes, you risk catastrophic water damage, mold growth, and costly repairs down the line. While the process may seem intimidating to DIY enthusiasts, breaking it down into manageable steps reveals that it is a logical, systematic procedure that relies on precision and the right materials.
Whether you are renovating a master bath or installing a new suite, understanding the mechanics of drainage is essential. Modern drainage solutions have evolved significantly, moving away from cumbersome, leak-prone assemblies to sleek, efficient systems. In this comprehensive guide, we will walk you through the 5 essential steps to secure your shower base, discuss the tools you need, and highlight how choosing premium products from industry leaders like Noahhometech can simplify the process.
- 1. Understanding Your Hardware: Compression vs. Solvent Weld
- 2. Essential Tools and Materials Required
- 3. Step 1: Subfloor Preparation and Dry Fitting
- 4. Step 2: Installing the Drain Assembly to the Shower Base
- 5. Step 3: Setting the Base and Mortar Application
- 6. Step 4: How to Connect Shower Base to Drain Pipe
- 7. Step 5: The Water Test and Finishing Touches
- 8. Choosing the Right Drain: Noahhometech Solutions
- 9. Troubleshooting Common Connection Issues
- 10. Summary Comparison of Sealant Methods
- 11. Frequently Asked Questions (FAQs)
- 12. References
1. Understanding Your Hardware: Compression vs. Solvent Weld
Before you even pick up a wrench, you must identify the type of drain assembly compatible with your shower base and local plumbing codes. The method you use to connect shower base to drain depends entirely on the hardware mechanism.
Compression Gasket Drains
These are the most common for DIY installations involving pre-formed shower bases (acrylic or fiberglass). They use a rubber compression gasket that is tightened via a nut or internal ring to create a water-tight seal around the drain pipe. They are favored because they allow you to set the shower base first and tighten the connection from above, which is much easier in tight spaces.
Solvent Weld (Glue-In) Drains
Common in custom tiled showers or specific pre-fab bases, these require gluing the PVC or ABS drain pipe directly into the drain hub. This creates a permanent, chemical bond. While incredibly secure, it leaves zero room for error; the measurements must be exact before the base is set.
2. Essential Tools and Materials Required
To successfully connect shower base to drain systems, preparation is key. Gathering the right tools beforehand prevents mid-project panic. Below is a checklist for a standard compression drain installation:
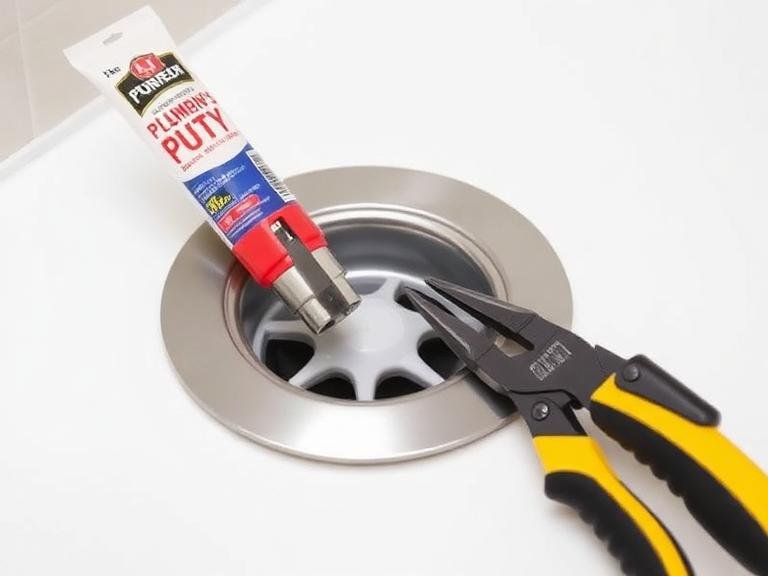
- Plumber’s Putty or 100% Silicone Caulk: Essential for sealing the upper flange of the drain to the shower base surface. Note: Use silicone if the base is natural stone or composite that might stain with oil-based putty.
- Channel-Lock Pliers or Drain Key: For tightening the large nut on the drain body.
- Hacksaw or Internal Pipe Cutter: To trim the drain pipe to the perfect height.
- Tape Measure and Level: Precision is non-negotiable.
- Liquid Dish Soap or Rubber Lubricant: This is a pro tip for helping the rubber gasket slide over the pipe.
- Shower Base and Drain Assembly: Ensure the drain diameter (usually 2 inches) matches your home’s plumbing.
3. Step 1: Subfloor Preparation and Dry Fitting
The first step to connect shower base to drain does not involve glue or gaskets; it involves geometry. You must ensure your subfloor is level, clean, and structurally sound. The hole in the subfloor must accommodate the drain assembly without being so large that it weakens the support for the shower base.
The Dry Fit
Place the shower base into position without any adhesive. Check that the drain hole in the base aligns perfectly with the waste pipe coming up from the floor. The waste pipe (typically 2-inch PVC or ABS) should be centered. If it is off-center, you may need to adjust the plumbing below the floor or use an offset drain adapter.
During this phase, verify the height of the drain pipe. For most compression drains, the pipe should extend slightly below the flush level of the drain opening, but instructions vary by manufacturer. Mark the pipe, remove the base, and cut the pipe to the required length using an internal pipe cutter or hacksaw. Ensure the cut is perfectly square and deburred; a jagged edge can damage the rubber sealing gasket later.
4. Step 2: Installing the Drain Assembly to the Shower Base
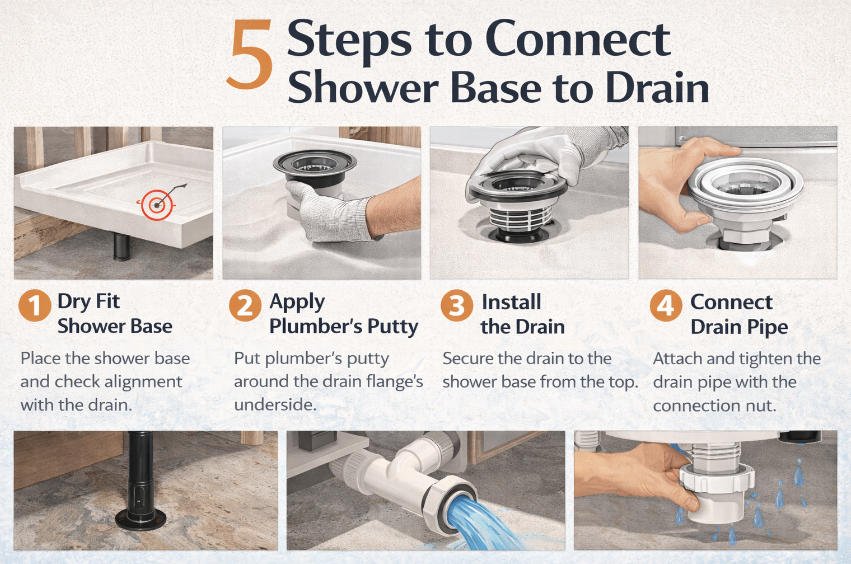
It is significantly easier to attach the drain body to the shower base before the base is permanently installed on the floor. This ensures you can get a tight seal on the upper flange without working in awkward positions.
Take the upper part of the drain assembly (the flange) and apply a generous bead of 100% silicone sealant or roll a snake of plumber’s putty around the underside of the lip. Insert this flange through the top side of the shower base drain hole.
On the underside of the base, place the rubber gasket over the threads of the drain body, followed by the friction washer (usually cardboard or paper). Thread the large locking nut onto the assembly. Tighten this nut firmly by hand, then use channel-lock pliers or a specialized drain wrench to snug it down. Do not over-tighten, as this can crack the shower base. As you tighten, putty or silicone will squeeze out from under the top flange—this is a good sign. Clean away the excess immediately.
5. Step 3: Setting the Base and Mortar Application
A shower base must feel solid underfoot. To achieve this and prevent flexing (which can cause leaks or cracks), most professionals recommend setting the base into a bed of mortar or structolite.
Mix a batch of mortar to a thick consistency. Spread it on the subfloor where the base will sit, keeping it away from the drain pipe area to ensure it doesn’t clog the connection space. Carefully lower the shower base into position. The drain pipe coming from the floor should slide upward into the drain assembly you installed in Step 2.
Crucial Leveling: Place a level on all sides of the shower threshold and the base itself. Shift the base slightly to settle it into the mortar until it is perfectly level. Allow the mortar to cure according to the package instructions (usually 24 hours) before proceeding to the final connection. This rigid foundation is critical before you connect shower base to drain gaskets, as movement later can break the seal.
6. Step 4: How to Connect Shower Base to Drain Pipe
This is the moment of truth. Now that the base is set and the pipe is centered inside the drain assembly, you need to create the final water-tight seal. We will focus on the compression gasket method, as it is the industry standard for most acrylic bases.
Lubrication is Key: Take the rubber compression gasket (a thick rubber ring) and apply a small amount of liquid dish soap or silicone lubricant to the outside and inside of the ring. This lubrication allows the rubber to slide easily into the tight space between the outside of the PVC pipe and the inside of the drain assembly.
Inserting the Gasket: Push the gasket down into the gap around the pipe. You may need to use a flat-head screwdriver to gently work it down until it sits flush or slightly below the top of the pipe. Be careful not to nick the rubber.
Tightening the Compression Nut: Most assemblies come with a tool to tighten an internal nut. As you screw this nut down (usually using the provided metal tool), it compresses the rubber gasket. The rubber expands outward against the drain body and inward against the pipe, creating a watertight seal that can withstand high pressure.
Noahhometech – Bathroom Drainage Experts

Choosing the right drain is as important as the installation method. Noahhometech stands as a leading shower drain manufacturer, specializing in high-quality, visually striking drainage solutions for bathrooms, hotels, and commercial spaces. Their products are engineered to make the connection process seamless while offering superior aesthetics.
As a premier OEM and ODM service provider, they offer a range of products made from 304 stainless steel with durable PVD finishes. Their advanced designs often feature user-friendly connection points that simplify the task to connect shower base to drain systems.
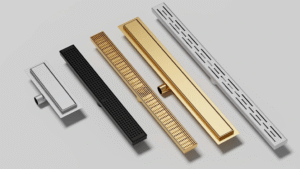
Our Products Include:
- Standard type shower drain: Robust and reliable for traditional layouts.
- Odor-Resistant Type Shower Drain: Features advanced sealing mechanisms to block sewer gases.
- Ultra-Thin Type Shower Drain: Ideal for minimalist designs where floor depth is limited.
- Invisible Shower Drain: Tile-insert designs that vanish into the floor pattern.
- Insert Wall Shower Drain: A sleek solution that moves the drain off the floor entirely.
- Linear Wall Shower Drain: Perfect for large format tiles and curbless showers.
- Strip Vertical Shower Drain: High-flow capacity for luxury multi-head showers.
- Square & Triangular Bathroom Drains: Geometric options to fit specific corner or center layouts.
With globally recognized certifications and rapid prototyping, Noahhometech ensures that your drainage solution is not only easy to install but built to last a lifetime.
7. Step 5: The Water Test and Finishing Touches
Never tile the walls or caulk the edges until you have verified the drain connection. The “flood test” is the final validation of your work.
Wait for the sealant (silicone/putty) to fully cure if you haven’t already. Place a test plug (often a rubber balloon or a mechanical plug) into the drain pipe. Fill the shower base with several inches of water. Let it sit for at least 2 to 4 hours. Mark the water line with a piece of tape.
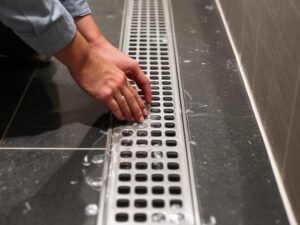
If the water level drops, you have a leak either at the gasket or the flange. If the level holds, pull the plug and watch the water drain. Ensure there are no backups and that the flow is smooth. Check the ceiling below (if accessible) for any signs of moisture. Once confirmed leak-free, snap the drain cover plate into place. You have successfully managed to connect shower base to drain.
9. Troubleshooting Common Connection Issues
Even seasoned plumbers encounter issues. Here are solutions to frequent problems:
- Pipe is too short: If the drain pipe doesn’t reach the gasket area, you cannot achieve a seal. You will need to use an internal pipe extender or cut the pipe lower and use a coupling to add length.
- Pipe is off-center: If the pipe pushes against the side of the drain assembly, the gasket won’t fit evenly. An offset drain connector may save the day, or you may need to open the subfloor to adjust the P-trap.
- Gasket won’t seat: If the gasket keeps popping up, ensure both the pipe and assembly are clean of debris. Use more lubricant and ensure the compression nut is engaging the threads correctly.
10. Summary Comparison of Sealant Methods
| Sealant Type | Best Application | Pros | Cons |
|---|---|---|---|
| Plumber’s Putty | Standard plastic/metal flanges on acrylic bases. | Easy to work with, easy to clean up, non-permanent. | Can stain porous materials like natural stone or marble. Drys out over decades. |
| 100% Silicone | Natural stone, uneven surfaces, modern composite bases. | Flexible, waterproof, does not stain stone. | Messy cleanup, requires cure time before testing (24 hrs). |
| Rubber Gasket (Compression) | Connection between pipe and drain body. | Allows for slight movement, easy to tighten from above. | Can degrade over long periods, requires precise pipe height. |
| Solvent Weld (Glue) | PVC/ABS drain connections. | Permanent fusion, leak-proof if done right. | Zero margin for error; difficult to repair or remove. |
11. Frequently Asked Questions (FAQs)
12. References
- International Plumbing Code (IPC) 2024 Edition – Section 417: Showers.
- Uniform Plumbing Code (UPC) Guidelines for Trap and Drain Sizing.