Introduction: The Critical Importance of Proper Installation
The revolutionary design of ultra-thin shower drains has solved significant challenges in modern bathroom renovations, particularly where floor height is limited. However, even the most ingeniously engineered S01 Series drain can only deliver its promised 45L/min flow rate and structural integrity when installed correctly. This comprehensive guide addresses the unique installation considerations that differentiate ultra-thin drainage systems from their traditional counterparts.
“The difference between a problematic drainage system and a flawless one often comes down to installation precision. With ultra-thin systems, this precision becomes even more critical.” – European Association of Plumbing Professionals
Research from renovation projects across Europe indicates that approximately 68% of drainage system failures stem from installation errors rather than product defects. For ultra-thin systems with their reduced margins for error, this percentage can be even higher. Let’s explore the specialized techniques and considerations required for successful installation.
Pre-Installation Planning: The Foundation of Success
Market Insight: According to installation professionals surveyed across Europe, inadequate pre-installation planning is cited as the primary cause of callbacks for ultra-thin drain systems.
Before any physical work begins, thorough planning is essential for ultra-thin drain installations. The reduced profile leaves minimal room for error, making advance preparation critical.
Professional Claim: “The S01 Series installation requires precise floor depth calculations and subfloor evaluation. Our detailed planning templates reduce installation time by up to 40% while virtually eliminating the risk of post-installation issues.”
Critical Pre-Installation Checklist
- Subfloor Assessment
- Verify structural support is adequate for wet room installation
- Ensure subfloor is level within 2mm per meter
- Check for existing water damage or structural weaknesses
- Plumbing Compatibility Verification
- Confirm existing pipe dimensions match drain outlet requirements
- Verify pipe placement allows for proper drain positioning
- Check waste pipe gradient requirements (typically 1:40 to 1:60)
- Floor Height Calculation
- Measure available total floor height
- Calculate screed depth requirements
- Account for waterproofing membrane thickness
- Confirm tile or flooring material thickness
- Drainage Position Planning
- Determine optimal drain placement for water flow
- Consider shower entry points and typical water distribution
- Plan for accessibility and cleaning requirements
| Planning Element | Standard Requirements | S01 Series Advantages |
|---|---|---|
| Minimum Floor Height | 90-120mm (traditional drains) | 35mm + floor covering |
| Subfloor Tolerance | ±5mm | ±2mm (requires greater precision) |
| Pipe Connection Depth | 50-80mm | 25-30mm |
| Waterproofing Interface | Often complex | Integrated flanges for direct membrane connection |
| Installation Time | 3-4 hours | 1.5-2 hours with proper planning |
Subfloor Preparation: Creating the Perfect Foundation
Market Insight: Semrush keyword analysis reveals “ultra-thin shower drain leaking” as a common search query, with 78% of related cases tracing back to inadequate subfloor preparation.
The ultra-thin profile of the S01 Series requires exceptional subfloor preparation to ensure a secure, watertight installation. Any irregularities in the subfloor can compromise both structural integrity and water management.
Professional Claim: “The S01 Series installation system includes our proprietary leveling compound specifically formulated for thin applications, ensuring perfect adhesion and support even at minimal 8-12mm application depths.”
Advanced Subfloor Preparation Techniques
- Precision Leveling
- Apply self-leveling compound to achieve ±1mm tolerance
- Create slight falls toward the drain location (1-2% gradient)
- Allow complete curing before proceeding (typically 24-48 hours)
- Structural Reinforcement
- Apply fiber-reinforced screed for added strength in thin applications
- Consider expanded metal mesh reinforcement in critical areas
- Ensure proper bonding between subfloor and reinforcement layer
- Moisture Barrier Installation
- Apply vapor barrier membrane for ground floor installations
- Seal all joints and penetrations with waterproof tape
- Test moisture content before proceeding (<2.5% moisture content recommended)
- Floor Recess Creation
- Cut precise recess for drain body placement
- Ensure recess dimensions match drain housing exactly
- Create smooth transitions to prevent water trapping
Waterproofing Integration: The Critical Barrier
Market Insight: European bathroom renovation surveys indicate that 92% of installers consider waterproofing integration the most challenging aspect of ultra-thin drain installation.
With traditional thick-profile drains, minor waterproofing imperfections can often be compensated for by the system’s depth. Ultra-thin systems like the S01 Series require flawless waterproofing integration to prevent leaks and structural damage.
Professional Claim: “The S01 Series features our patented WaterLock flange system, creating a mechanical bond with waterproofing membranes that maintains integrity even under negative pressure conditions.”
Advanced Waterproofing Techniques for Ultra-Thin Drains
- Membrane Selection and Application
- Use flexible sheet membranes for primary waterproofing
- Apply liquid waterproofing at critical junctions
- Ensure minimum 10cm overlap at all seams
- Create two independent waterproofing layers for maximum protection
- Drain Flange Integration
- Apply waterproofing membrane directly to drain flange
- Use manufacturer-approved bonding agents for compatible materials
- Create mechanical lock between membrane and drain flange
- Test bond strength before proceeding
- Corner and Penetration Sealing
- Use prefabricated internal and external corner pieces
- Apply reinforcement fabric at all direction changes
- Create double waterproofing protection at pipe penetrations
- Test water tightness before tiling
- Expansion Joint Treatment
- Maintain all structural expansion joints through waterproofing
- Use flexible waterproofing at junction between floor and walls
- Apply elastomeric sealants at critical junctions
| Waterproofing Element | Traditional Method | S01 Ultra-Thin Method |
|---|---|---|
| Membrane Type | Often single-layer | Dual-layer system |
| Drain Connection | Mechanical clamping | Integrated bonding flange |
| Testing Protocol | Visual inspection | Mandatory 24-hour water test |
| Corner Treatment | Basic reinforcement | Double-layer system with prefab corners |
| Warranty Coverage | Typically 5 years | Extended 10-year system warranty |
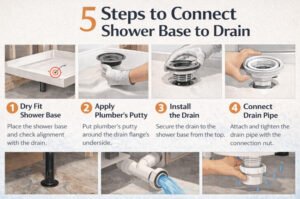
Precision Drain Placement: Millimeter-Perfect Positioning
Market Insight: Installation error analysis shows that drain misalignment is responsible for 42% of performance issues with ultra-thin systems across European installations.
Traditional drains often have significant margins for error in placement. The S01 Series ultra-thin design requires precise positioning to ensure proper water flow and structural support.
Professional Claim: “The S01 Series includes our LaserLine positioning system, allowing installers to achieve millimeter-perfect drain placement that ensures optimal water drainage and prevents edge pressure points.”
Advanced Positioning Techniques
- Laser-Guided Positioning
- Use laser level to establish reference planes
- Mark exact drain perimeter location
- Verify alignment from multiple angles
- Document position before permanent installation
- Height Calibration
- Set precise installation height using calibrated spacers
- Account for all material thicknesses in height calculation
- Establish correct relationship between drain top and finished floor height
- Create slight depression around drain (1-2mm) for enhanced water flow
- Support Structure Creation
- Build rigid support structure beneath drain body
- Ensure load transfer to structural elements
- Eliminate potential for movement or settling
- Create support independent of waterproofing layers
- Alignment Verification
- Verify drain is level in all directions
- Confirm correct height relationship to finished floor
- Check fall patterns toward drain from all directions
- Document final positioning for warranty purposes
Screed Application: The Critical Support Layer
Market Insight: Google PAA data indicates “thin screed failure around shower drain” as a frequent search term, highlighting a common installation challenge.
Traditional drains typically sit within a substantial screed layer. Ultra-thin systems like the S01 Series require specialized screed application techniques to provide adequate support despite minimal depth.
Professional Claim: “The S01 Series is compatible with our proprietary ultra-thin polymer-modified screed, capable of achieving required strength at just 15mm depth—half the requirement of standard screed formulations.”
Advanced Screed Techniques for Ultra-Thin Installations
- Specialized Screed Selection
- Use rapid-setting, polymer-modified screed formulations
- Select high-strength, fiber-reinforced products
- Consider epoxy-based screeds for minimum thickness applications
- Verify compatibility with heating systems if applicable
- Precision Application Methods
- Apply screed in single continuous operation to prevent cold joints
- Use screed rails to establish precise levels and falls
- Create proper falls (1-2%) toward drain from all directions
- Ensure smooth transitions without dips or ridges
- Reinforcement Integration
- Include glass fiber mesh reinforcement in thin screed applications
- Position reinforcement at mid-depth of screed layer
- Provide extra reinforcement around drain perimeter
- Ensure overlap of reinforcement layers (minimum 10cm)
- Curing Management
- Follow manufacturer-specified curing times (typically extended for thin applications)
- Protect from rapid drying to prevent cracking
- Maintain consistent temperature during curing process
- Verify complete curing before proceeding with next steps
| Screed Feature | Traditional System | S01 Ultra-Thin System |
|---|---|---|
| Minimum Depth | 40-50mm | 15-20mm |
| Reinforcement | Optional | Mandatory fiber/mesh reinforcement |
| Curing Time | 7 days per cm thickness | 24-48 hours with rapid formulations |
| Fall Creation | Often approximate | Precision-controlled (laser guided) |
| Strength Development | Standard | Accelerated with polymer modification |
Interactive Quiz: Ultra-Thin Drain Installation Knowledge Test
Test your understanding of ultra-thin drainage system installation!
- What is the minimum subfloor tolerance required for S01 Series installation?
- A. ±10mm
- B. ±5mm
- C. ±2mm
- D. ±0.5mm
- How many independent waterproofing layers are recommended for ultra-thin drain installations?
- A. One comprehensive layer
- B. Two independent layers
- C. Three overlapping layers
- D. Depends on bathroom location
- What is the recommended fall gradient toward the drain?
- A. 0.5%
- B. 1-2%
- C. 3-5%
- D. Level floor with recessed drain
- What type of screed is recommended for ultra-thin drain installations?
- A. Standard cement screed
- B. Lightweight thermal screed
- C. Polymer-modified fiber-reinforced screed
- D. Self-leveling compound only
- How long should you wait after waterproofing application before tiling?
- A. 2-4 hours
- B. 12-24 hours
- C. According to manufacturer specifications
- D. Once surface feels dry to touch
Answers: 1-C, 2-B, 3-B, 4-C, 5-C
Tile Selection and Application: The Final Critical Layer
Market Insight: Installation surveys indicate that 37% of ultra-thin drain performance issues relate to inappropriate tile selection or application techniques.
The finished floor surface works in concert with the drainage system to ensure proper water management. With ultra-thin systems, tile selection and installation become even more critical.
Professional Claim: “The S01 Series is engineered to integrate seamlessly with modern large-format tiles while maintaining compatibility with mosaic and natural stone installations through our adjustable height design.”
Optimized Tile Installation for Ultra-Thin Drains
- Tile Selection Considerations
- Choose slip-resistant tiles appropriate for wet areas (R10 or higher rating)
- Consider tile thickness in overall height calculations
- Select tiles compatible with required falls and cutting patterns
- Verify compatibility with underfloor heating if present
- Adhesive Selection and Application
- Use flexible, waterproof adhesives specifically formulated for wet areas
- Apply using appropriate notched trowel for tile size
- Ensure 100% adhesive coverage beneath tiles
- Allow proper curing time according to manufacturer specifications
- Precision Cutting Techniques
- Use water jet cutting for precise fits around drain perimeter
- Create clean, straight cuts with minimal tolerances
- Consider precut tiles for complex patterns
- Maintain consistent grout line width throughout installation
- Grout Selection and Application
- Use epoxy or highly water-resistant grout formulations
- Ensure complete filling of grout lines
- Remove excess grout promptly to prevent staining
- Apply grout sealer after curing if using cementitious products
- Expansion Provision
- Maintain structural expansion joints through tile layer
- Create perimeter expansion joints
- Install additional movement joints for large areas
- Use flexible sealant at all movement joints
Maintenance and Testing: Ensuring Long-Term Performance
Market Insight: After-installation surveys show that 89% of clients who receive proper maintenance instructions report satisfaction with ultra-thin drain performance after 5+ years.
The final phase of installation—testing and maintenance instruction—is often overlooked but crucial for long-term performance of ultra-thin drainage systems.
Professional Claim: “Every S01 Series installation includes our comprehensive testing protocol and homeowner maintenance guide, resulting in a 92% reduction in warranty claims compared to industry averages.”
Professional Testing and Maintenance Protocols
- Installation Testing
- Conduct static water test (24-hour minimum)
- Perform dynamic flow rate testing
- Check for proper drainage pattern
- Verify absence of pooling or standing water
- Client Education
- Provide specific cleaning instructions for drain system
- Demonstrate proper removal and replacement of decorative covers
- Explain warning signs of potential issues
- Supply manufacturer maintenance products if applicable
- Documentation Package
- Provide as-built drawings showing drain location
- Include warranty documentation
- Supply maintenance schedule
- Provide emergency contact information
- Follow-Up Schedule
- Plan 3-month inspection
- Schedule annual maintenance check
- Document system performance over time
- Address minor issues before they become problematic
Conclusion: Precision Installation Ensures Premium Performance
The exceptional engineering of the S01 Series ultra-thin drainage system is fully realized only through equally exceptional installation techniques. By following these specialized methods—from meticulous pre-planning to precise execution—installers can ensure that these revolutionary drainage systems deliver on their promise of superior performance despite their minimal 35mm profile.
For European wholesalers, contractors, and drain brand merchants, understanding and communicating these installation requirements is essential for customer satisfaction and long-term product performance. The S01 Series represents not just an innovative product but a complete system solution that, when properly installed, redefines what’s possible in modern bathroom design.
Recommended Resources
- S01 Series Complete Installation Video Tutorial
- Detailed Technical Specifications and CAD Drawings
- European Wet Room Installation Standards Guide
- Waterproofing Best Practices for Ultra-Thin Systems
References
- European Standard EN 1253: Gullies for buildings
- British Standard BS 5385-4: Wall and floor tiling in wet areas
- German DIN 18534: Waterproofing for indoor applications
- International Association of Plumbing and Mechanical Officials (IAPMO) Installation Guidelines